Hello Friends, we are going to learn, step by step process to create Spring Boot application with Eclipse and Maven.here we will learn how to create Manual Spring Boot application from scratch.
What You Need.
Create A Maven Project
Create A Maven Project in Eclipse or STS or your favorite IDE
Select File -> New -> Project.

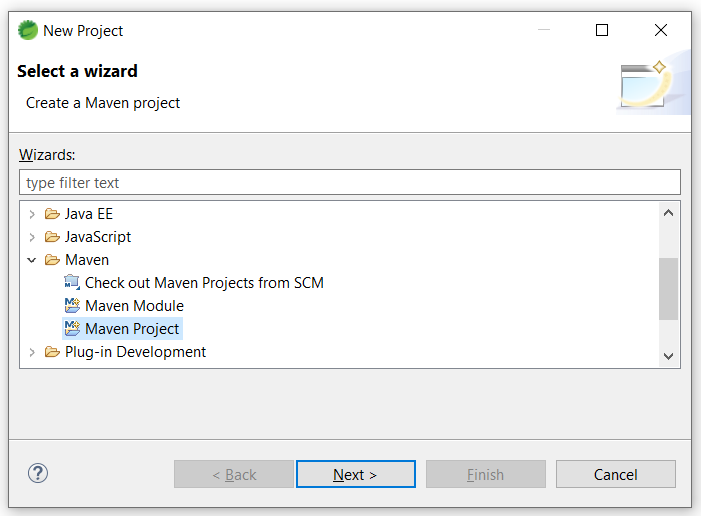
it will open Select a wizard,
Select Maven -> Maven Project and click on Next
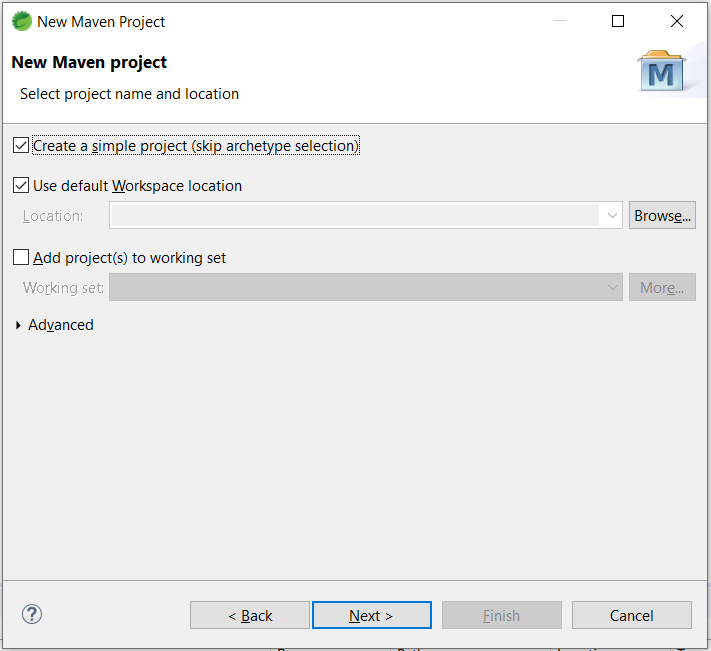
Check to Create a simple project and click on Next
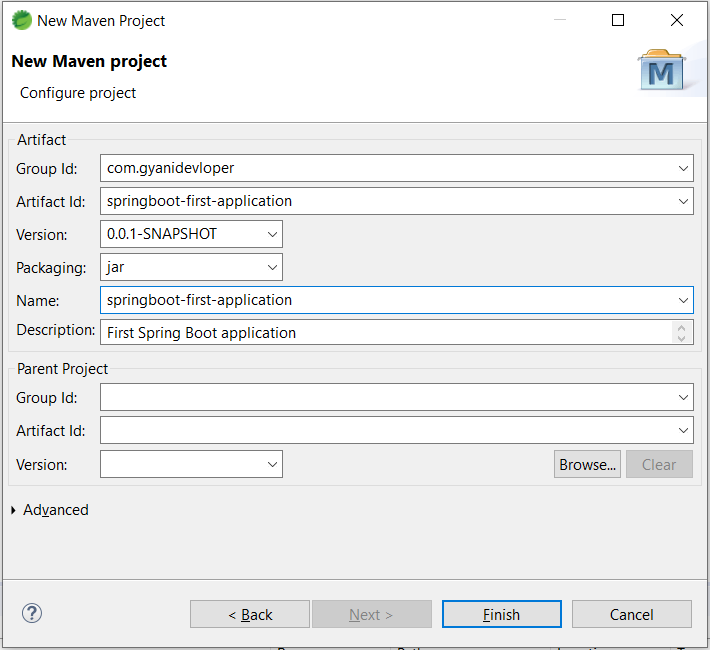
please fill the project details such as Group Id, Artifact Id, Name and Description and click on Finish
- Group Id :
com.gyanideveloper - Artifact Id :
springboot-first-application - Name :
springboot-first-application - Description :
First Spring Boot application
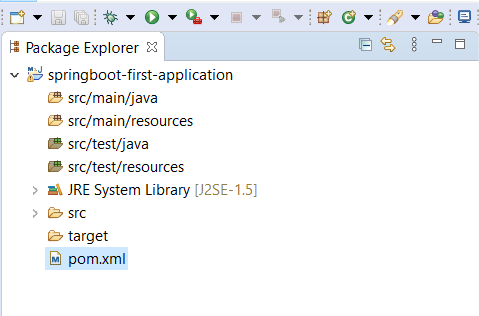
Initial project structure look like as below.
open pom.xml and add Parent Project, Properties & Spring web dependency.
Spring Boot Starter Parent
Maven users can inherit from the spring-boot-starter-parent project to obtain sensible defaults.
It provides the following features:
- Java 1.6 as the default compiler level.
- UTF-8 source encoding.
- A Dependency Management section, allowing you to omit
<version>tags for common dependencies, inherited from thespring-boot-dependenciesPOM. - Sensible resource filtering for
application.propertiesandapplication.yml
On the last point: since the default config files accept Spring style placeholders (${…}) the Maven filtering is changed to use @..@ placeholders (you can override that with a Maven property resource.delimiter).
<parent>
    <groupId>org.springframework.boot</groupId>
    <artifactId>spring-boot-starter-parent</artifactId>
    <version>2.3.0.RELEASE</version>
    <relativePath/> <!-- lookup parent from repository -->
</parent>
set Java 8 in pom.xml, you can change below property to set Java version.
<properties>
    <java.version>1.8</java.version>
</properties>
Spring Web dependency
We can develop web application including RESTful using Spring MVC, uses Apache tomcat as the default embedded container.
Add Spring Web dependency in dependencies
<dependency>
      <groupId>org.springframework.boot</groupId>
      <artifactId>spring-boot-starter-web</artifactId>
</dependency>
Spring Boot Maven Plugin
The Spring Boot Maven Plugin provides Spring Boot support in Maven. It allows you to package executable jar or war archives, run Spring Boot applications, generate build information & start your Spring Boot application prior to running integration tests.
<build>
    <plugins>
      <plugin>
        <groupId>org.springframework.boot</groupId>
        <artifactId>spring-boot-maven-plugin</artifactId>
      </plugin>
    </plugins>
</build>
final pom.xml
<project xmlns="http://maven.apache.org/POM/4.0.0"
	xmlns:xsi="http://www.w3.org/2001/XMLSchema-instance"
	xsi:schemaLocation="http://maven.apache.org/POM/4.0.0 https://maven.apache.org/xsd/maven-4.0.0.xsd">
	<modelVersion>4.0.0</modelVersion>
	<groupId>com.gyanidevloper</groupId>
	<artifactId>springboot-first-application</artifactId>
	<version>0.0.1-SNAPSHOT</version>
	<name>springboot-first-application</name>
	<description>First Spring Boot application</description>

	<parent>
		<groupId>org.springframework.boot</groupId>
		<artifactId>spring-boot-starter-parent</artifactId>
		<version>2.3.0.RELEASE</version>
		<relativePath /> <!-- lookup parent from repository -->
	</parent>

	<properties>
		<java.version>1.8</java.version>
	</properties>

	<dependencies>
		<dependency>
			<groupId>org.springframework.boot</groupId>
			<artifactId>spring-boot-starter-web</artifactId>
		</dependency>
	</dependencies>

	<build>
		<plugins>
			<plugin>
				<groupId>org.springframework.boot</groupId>
				<artifactId>spring-boot-maven-plugin</artifactId>
			</plugin>
		</plugins>
	</build>
</project>
Update Maven Project
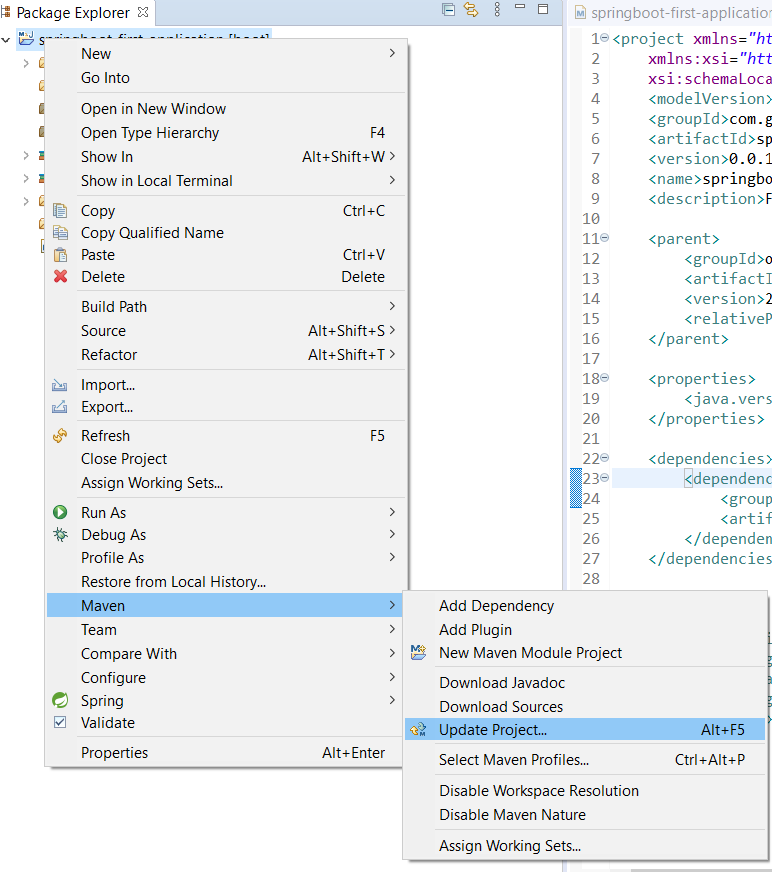
right-click on project -> select maven -> update project.
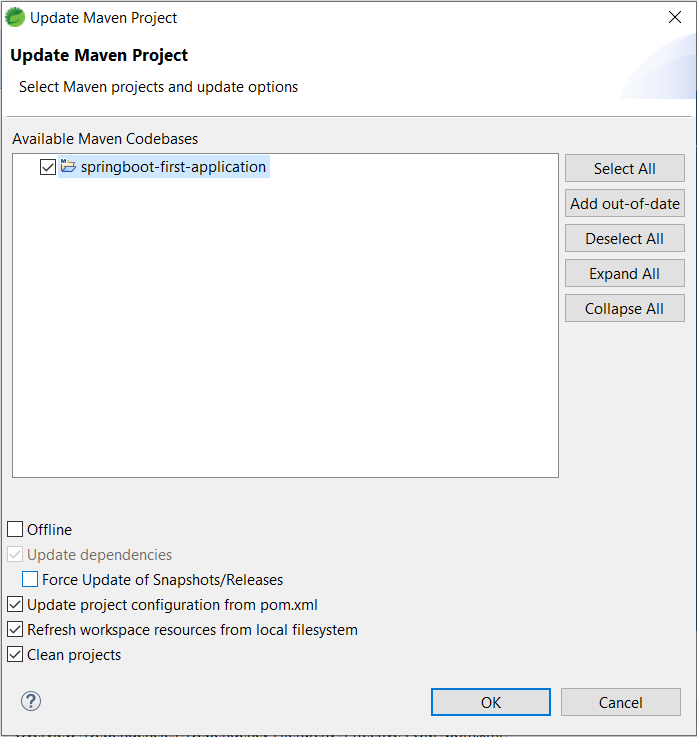
it shows the update Project window click on OK
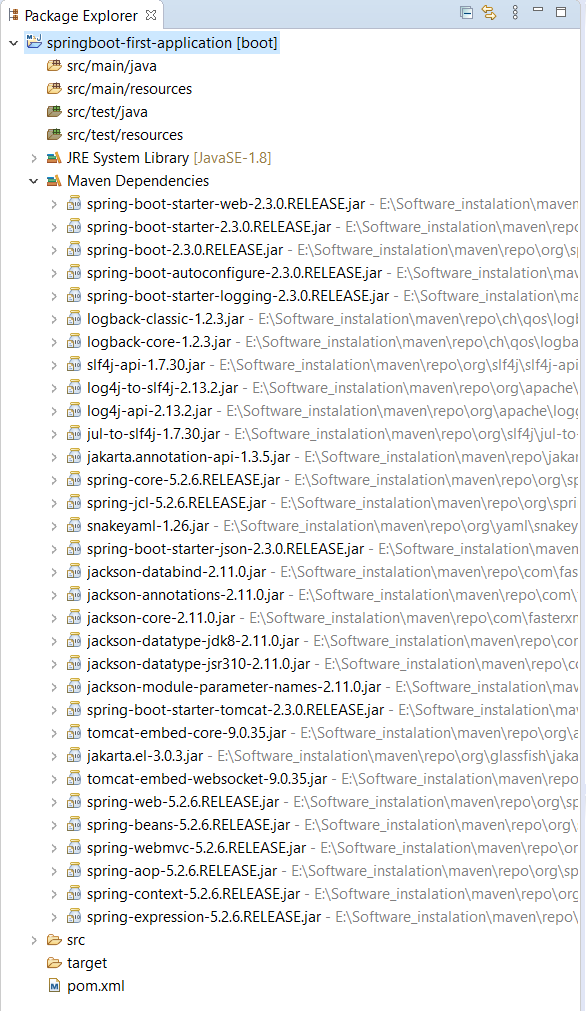
After update Project Structure look like below.
Create Class and add main method in it.
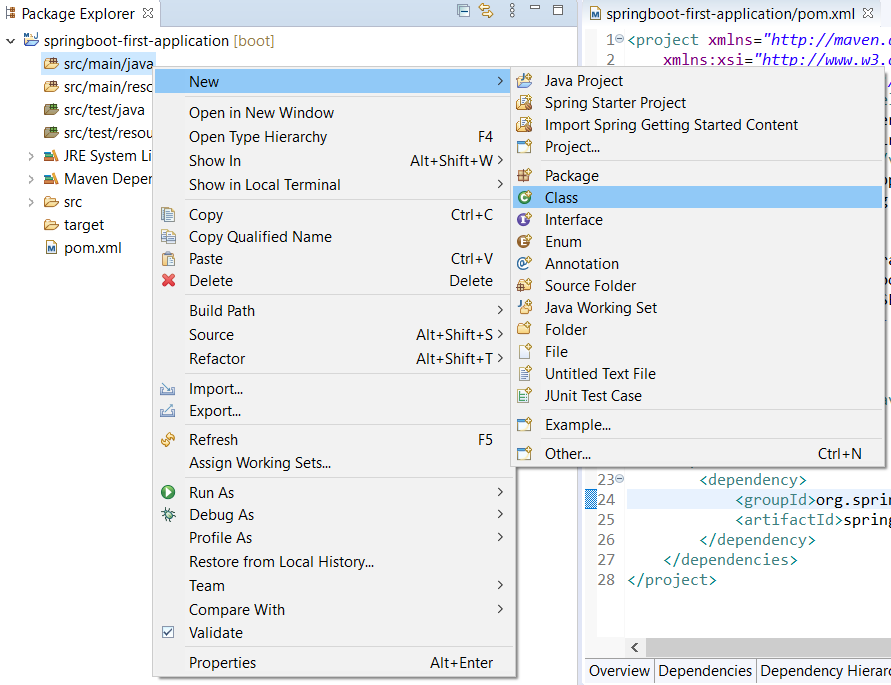
right click on src/main/java -> New - > Class
set class name and package
Package:com.gyanideveloper.springbootName:App- select on
public static void main(String[] arg) - click on Finish
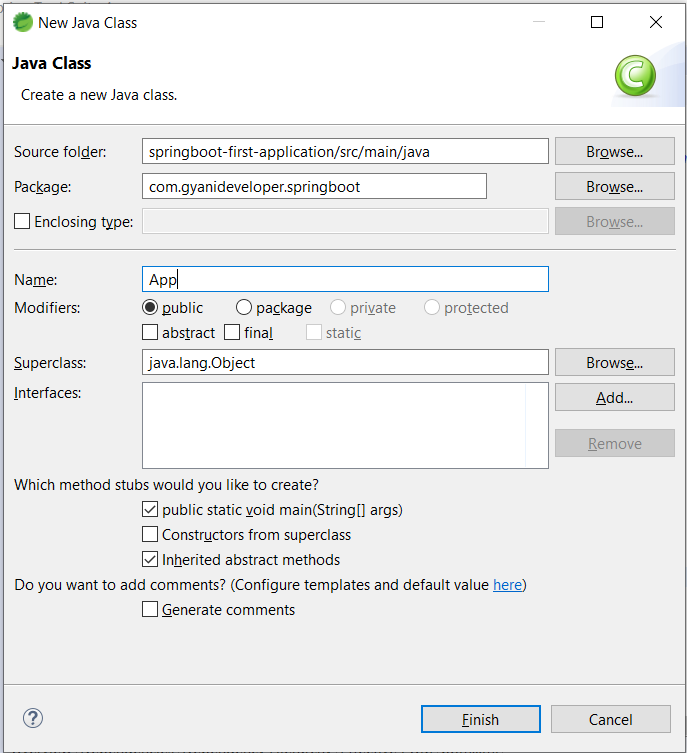
Once the Java class is created that is App.java, it will look like as below.
package com.gyanideveloper.springboot;

public class App {

	public static void main(String[] args) {
		// TODO Auto-generated method stub

	}

}
Spring Boot Application
we need make Java to Spring Boot application, please follow steps to do.
Step-1
we need to annotate our App class with @SpringBootApplication in App.java file.
import org.springframework.boot.autoconfigure.SpringBootApplication;

@SpringBootApplication
public class App {
Step-2
Add SpringApplication.run(App.class, args); in main method of App.java
public static void main(String[] args) {
   SpringApplication.run(App.class, args);
}
Final App.java look like below.
package com.gyanideveloper.springboot;

import org.springframework.boot.SpringApplication;
import org.springframework.boot.autoconfigure.SpringBootApplication;

@SpringBootApplication
public class App {

	public static void main(String[] args) {
		SpringApplication.run(App.class, args);
	}

}
create controller class in same package or subpackage and annotate the class with @RestController and add method hello and annotate it with @GetMapping("/hello") or @RequestMapping("/hello")
package com.gyanideveloper.springboot.controller;

import org.springframework.web.bind.annotation.GetMapping;
import org.springframework.web.bind.annotation.RequestParam;
import org.springframework.web.bind.annotation.RestController;

@RestController
public class HelloController {

	@GetMapping("/hello")
	public String hello(@RequestParam String name) {
		return "Hello " + name;
	}
}
Start a Spring Boot Application
right-click on Project -> run as -> java application and select Main Class. and click on OK button.
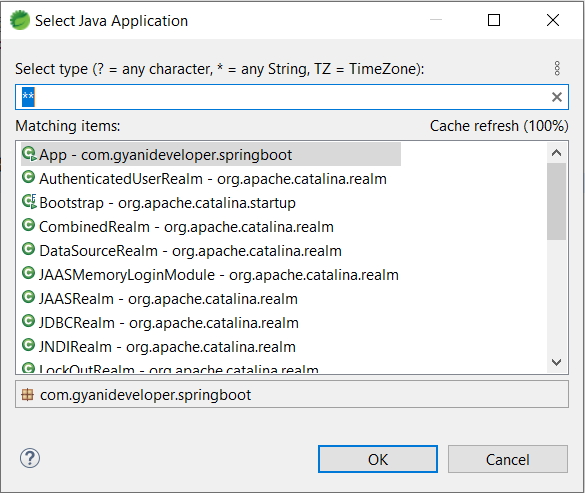
our Spring Boot application will start on port number 8080
If the application fails to start because the port is in use. please check our How to Change the Default Port in Spring Boot post for more details.
  .   ____          _            __ _ _
 /\\ / ___'_ __ _ _(_)_ __  __ _ \ \ \ \
( ( )\___ | '_ | '_| | '_ \/ _` | \ \ \ \
 \\/  ___)| |_)| | | | | || (_| |  ) ) ) )
  '  |____| .__|_| |_|_| |_\__, | / / / /
 =========|_|==============|___/=/_/_/_/
 :: Spring Boot ::        (v2.3.0.RELEASE)

2020-05-20 18:00:00.152  INFO 10168 --- [           main] com.gyanideveloper.springboot.App        : Starting App on DESKTOP-AXWZ with PID 10168 (C:\Users\Gyani\Documents\workspace-spring-tool-suite-4-4.6.1.RELEASE\springboot-first-application\target\classes started by Gyani in C:\Users\Gyani\Documents\workspace-spring-tool-suite-4-4.6.1.RELEASE\springboot-first-application)
2020-05-20 18:00:00.155  INFO 10168 --- [           main] com.gyanideveloper.springboot.App        : No active profile set, falling back to default profiles: default
2020-05-20 18:00:01.644  INFO 10168 --- [           main] o.s.b.w.embedded.tomcat.TomcatWebServer  : Tomcat initialized with port(s): 8080 (http)
2020-05-20 18:00:01.656  INFO 10168 --- [           main] o.apache.catalina.core.StandardService   : Starting service [Tomcat]
2020-05-20 18:00:01.656  INFO 10168 --- [           main] org.apache.catalina.core.StandardEngine  : Starting Servlet engine: [Apache Tomcat/9.0.35]
2020-05-20 18:00:01.752  INFO 10168 --- [           main] o.a.c.c.C.[Tomcat].[localhost].[/]       : Initializing Spring embedded WebApplicationContext
2020-05-20 18:00:01.752  INFO 10168 --- [           main] o.s.web.context.ContextLoader            : Root WebApplicationContext: initialization completed in 1520 ms
2020-05-20 18:00:01.983  INFO 10168 --- [           main] o.s.s.concurrent.ThreadPoolTaskExecutor  : Initializing ExecutorService 'applicationTaskExecutor'
2020-05-20 18:00:02.217  INFO 10168 --- [           main] o.s.b.w.embedded.tomcat.TomcatWebServer  : Tomcat started on port(s): 8080 (http) with context path ''
2020-05-20 18:00:02.253  INFO 10168 --- [           main] com.gyanideveloper.springboot.App        : Started App in 2.598 seconds (JVM running for 3.105)
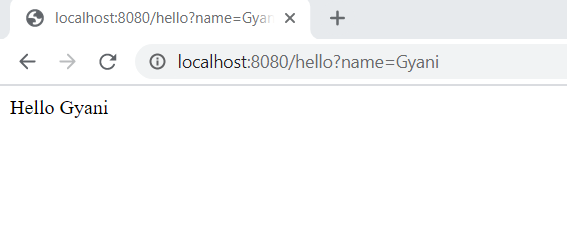
Check our Rest API /hello
open browser and type localhost:8080/hello?name=Gyani in address bar.
Final Note
we have learn how to create spring boot application from scratch.

Very nice artical